Transform Your Small Bathroom into a Spa-Like Sanctuary

Does your small bathroom feel more like a cramped utility closet than a place to decompress? Most people assume that a luxury spa experience requires hundreds of square feet and a marble soaking tub, but the reality of high-end design is rooted in spatial geometry, light temperature, and material tactile quality rather than sheer volume.
When you are working with a footprint of less than 40 square feet, every millimeter counts. You cannot afford "visual clutter"—those small, mismatched items that break the eye's path. Instead, you must approach the renovation with the precision of a structural engineer and the eye of an interior stylist. To transform a tight space, we will focus on four specific pillars: structural optimization, lighting layers, material cohesion, and sensory refinement.
1. Structural Optimization: Maximizing the Footprint
The biggest mistake in small bathroom design is failing to respect the "circulation path." If you have to turn your shoulders sideways to reach the sink, the layout is working against you. While moving plumbing stacks is a massive undertaking, you can optimize the existing layout through smart cabinetry and verticality.
Floating Vanities and Visual Floor Space
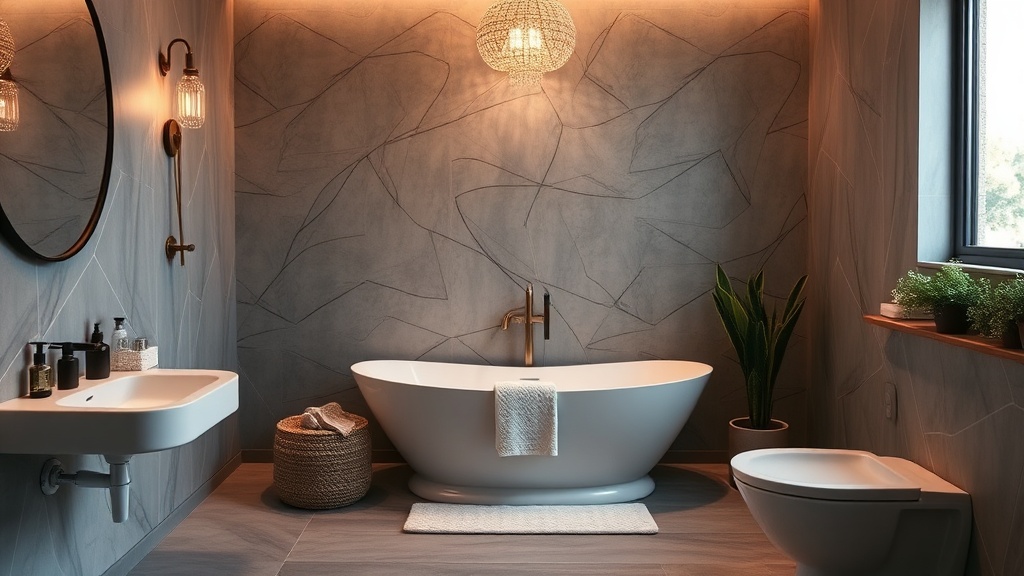
To make a room feel larger, you need to increase the amount of visible floor area. A standard floor-mounted vanity creates a heavy visual block. Instead, opt for a floating vanity. By mounting the cabinet directly to the wall studs using heavy-duty steel brackets, you expose the floor underneath. This trick tricks the brain into perceiving more square footage. Look for models with clean lines, such as the IKEA Godmorgon or custom walnut cabinetry, to keep the aesthetic streamlined.
Vertical Storage Solutions
When floor space is at a premium, look up. Instead of a bulky linen tower that eats into your standing room, install custom floating shelves above the toilet. Use 1x6 or 1x8 Douglas Fir boards for a warm, organic feel, or white lacquered wood for a seamless look. Ensure your shelves are anchored with heavy-duty toggle bolts if you are mounting into drywall, or better yet, find the studs using a stud finder to ensure they can hold the weight of heavy glass apothecary jars.
The Glass Partition Strategy
If your bathroom features a tub/shower combo, the heavy, opaque shower curtain is your enemy. It acts as a visual wall, cutting your room in half. Replace the curtain with a fixed glass panel or a clear glass door. A frameless glass partition allows the eye to travel through to the back wall, instantly doubling the perceived depth of the room. If you want privacy without losing light, consider a fluted or reeded glass, which provides a textured, high-end architectural detail while obscuring silhouettes.
2. Lighting Layers: Engineering the Ambience
Standard overhead lighting is often harsh and unflattering, casting deep shadows under the eyes. A spa-like environment requires "layered lighting"—a combination of task, ambient, and accent light. This is where most DIYers fail by relying on a single, bright LED ceiling fixture.
The Rule of Three Layers
To achieve a professional-grade lighting scheme, you must implement at least three distinct sources:
- Task Lighting: This should be positioned at eye level, not above your head. Instead of a single bar light above the mirror, install two vertical sconces on either side of the vanity. This eliminates the shadows caused by overhead light and provides even illumination for grooming. Look for fixtures with a high Color Rendering Index (CRI) of 90 or above to ensure skin tones look natural.
- Ambient Lighting: This is your general illumination. If you have a recessed light, ensure it is on a dimmer switch. Being able to drop the light levels from 100% to 20% is the difference between a "getting ready" room and a "soaking in the tub" room.
- Accent Lighting: Use this to highlight architectural features. A small, waterproof LED strip tucked under the floating vanity or behind a mirror creates a "glow" effect that makes the fixtures appear to float, adding depth to the room.
Temperature Control
Avoid "daylight" bulbs (5000K+), which can feel clinical and cold. For a sanctuary feel, aim for "warm white" bulbs in the 2700K to 3000K range. This mimics the soft, golden hour sunlight and promotes relaxation. If you are installing smart bulbs, such as the Philips Hue system, you can program "scenes" that transition from bright white for morning routines to a dim, amber glow for evening baths.
3. Material Cohesion: Texture and Tones
In a small space, a high variety of colors and patterns can feel chaotic. To create a sense of calm, you should adopt a cohesive material palette. This doesn't mean everything has to be white; it means everything must belong to the same "family."
The Power of Monochromatic Textures
If you want to use color, stick to a monochromatic or analogous scheme. For example, if you love the Japandi aesthetic, combine various shades of beige, sand, and oatmeal. The key to preventing a monochromatic room from looking flat is to vary the texture. Pair a matte ceramic sink with a honed marble countertop and a textured linen hand towel. The interplay of light on different surfaces creates visual interest without adding "noise."
High-End Finishes on a Budget
You don't need to purchase expensive stone slabs to get a luxury look. You can achieve a high-end aesthetic by focusing on your hardware. Replace standard chrome faucets with brushed gold, matte black, or oil-rubbed bronze fixtures. A heavy, solid brass faucet from a brand like Kohler or Delta adds a tactile weight to the room that plastic or thin metal cannot replicate. Even a simple change in hardware can elevate the entire architectural feel of the vanity.
Tile Geometry and Grout Selection
When selecting tile, consider the scale. Large-format tiles (such as 12x24 inch porcelain) can actually make a small floor look larger because there are fewer grout lines to break up the visual field. If you choose a patterned tile, keep it to one "feature" area—like the shower floor or a backsplash—and keep the rest of the surfaces neutral. Pro tip: Match your grout color to your tile color. This creates a seamless, monolithic look that expands the space visually.
4. The Sensory Finish: Refining the Experience
A true sanctuary engages more than just the eyes. The final 5% of your design work involves the sensory details that define the atmosphere.
Scent and Humidity Control
A bathroom that smells like damp towels is not a spa. Ensure your ventilation system is up to code. If you are installing a new exhaust fan, look for one with a high CFM (Cubic Feet per Minute) rating and a low Sones (noise) rating. A quiet, powerful fan prevents the buildup of humidity that can degrade your paint and materials. To add a signature scent, use a reed diffuser with essential oils like eucalyptus or sandalwood rather than a heavy, synthetic spray.
Curated Minimalism
The "spa" feeling is destroyed by the sight of a plastic toothbrush holder or a half-empty bottle of bright blue shampoo. To maintain the aesthetic, implement a "hidden storage" rule. Use glass or ceramic canisters for items you need on the counter, and keep everything else inside the vanity. Invest in a high-quality waffle-weave cotton towel in a neutral tone. The weight and texture of the fabric are just as important as the color.
"Design is not just about how a space looks, but how it functions within the constraints of its environment. In a small bathroom, every choice must be intentional, serving both a structural and an emotional purpose."
By treating your small bathroom as a technical challenge rather than a limitation, you can create a space that feels expansive, luxurious, and deeply restorative. Start with the math of your space, respect the light, and never underestimate the power of a well-placed texture.