Swap Your Old Cabinet Hardware for a Fresh Look

A kitchen with high-end quartz countertops and a custom backsplash can still feel dated if the hardware is a mismatched collection of worn, brass-plated pulls from a 2005 builder-grade installation. Changing your cabinet hardware is the fastest, most cost-effective way to alter the visual weight and style of your cabinetry without a full renovation. This guide covers the technical precision required to select, measure, and install new knobs and pulls so your kitchen or bathroom looks professionally updated rather than DIY-patched.
Determine Your Hardware Style and Scale
Before buying a single screw, you must understand the architectural language of your space. Hardware acts as the "jewelry" of a room, and the scale of that jewelry dictates the mood. If you have large, Shaker-style cabinet doors, tiny 1-inch knobs will look disproportionate and may actually make the cabinets feel heavier. Conversely, oversized pulls on a small vanity can overwhelm the piece.
Knobs vs. Pulls
Knobs are single-point fasteners, typically used on upper cabinets or small vanities. They are easy to install but can feel less ergonomic for heavy drawers. Pulls (or handles) are elongated and usually require two screw holes. These are superior for large drawers because they provide more leverage, making it easier to pull open heavy drawers filled with cast iron pans or heavy linens. For a modern, streamlined look, consider a single long "appliance pull" on a large pantry door to create a continuous vertical line.
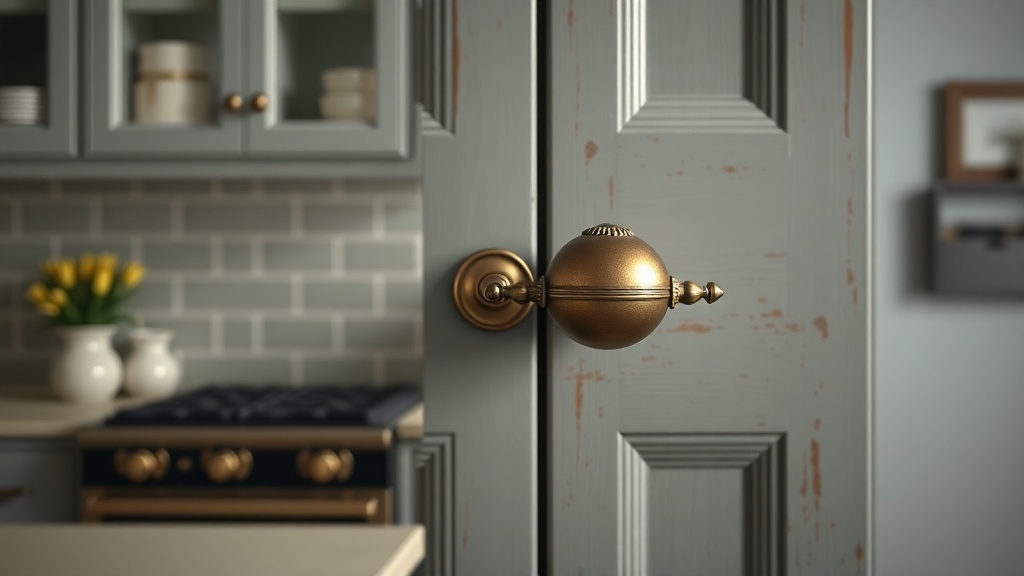
Understanding Finishes
Don't feel restricted to matching your faucet perfectly, but aim for a cohesive metal story. If you have a matte black faucet, pairing it with brushed nickel hardware creates a sophisticated, high-contrast look. If you want a warmer, traditional feel, look at unlacquered brass, which develops a patina over time. For a contemporary, industrial edge, consider knurled textures or satin nickel. Avoid "shiny" chrome if you want to avoid a clinical, dated feeling; matte or brushed finishes tend to hide fingerprints and water spots much more effectively.
The Math of Hardware: Measuring Center-to-Center
The most common mistake in hardware replacement is failing to measure the "center-to-center" distance. This is the distance from the center of one screw hole to the center of the second screw hole. If you buy a pull that is 5 inches long, but your existing holes are spaced 3.75 inches apart, the new hardware will not fit without drilling new holes.
To avoid a trip back to the hardware store, follow this technical workflow:
- Remove an existing piece: Unscrew one knob or pull from a cabinet door.
- Use a digital caliper or a precise ruler: Do not use a standard tape measure for this, as the metal hook at the end can introduce a 1/16-inch error. A digital caliper is the gold standard for accuracy.
- Measure the center-to-center distance: Place the caliper tips in the center of the two holes. Note the exact decimal or fraction.
- Check the "Projection": This is how far the hardware sticks out from the cabinet face. If you have a narrow walkway or a tight kitchen triangle, look for "low-profile" pulls to prevent bumping into them with your hips.
If your existing holes are spaced at a non-standard measurement (for example, an odd 91mm instead of a standard 3 inches or 128mm), you have two options: search for "specialty hardware" online that matches that specific metric, or prepare to patch and drill. If you have to drill new holes, you will need to fill the old ones with wood filler, sand them flush, and repaint the cabinet face before installing the new hardware.
Tools Required for a Professional Installation
A professional finish is determined by the quality of your tools. Do not attempt to tighten hardware using only your fingers or a cheap screwdriver; you risk stripping the screw head or cracking the cabinet face.
- Phillips or Flathead Screwdriver: Ensure the bit fits snugly into the screw head to prevent slipping.
- Power Drill with a Brad Point Bit: If you are drilling new holes, a brad point bit is essential because it prevents the bit from "walking" or sliding across the wood surface before it bites.
- Painter's Tape: Use this to mark your drill points to prevent splintering.
- Level: Essential for ensuring pulls are perfectly horizontal or vertical.
- Sandpaper (220 grit): To smooth out any edges if you are drilling new holes.
- Wood Filler/Bondo: To patch old holes if you are changing the spacing.
Step-by-Step Installation Guide
Follow these steps to ensure your hardware is straight, secure, and aesthetically aligned.
Step 1: Removal and Surface Prep
Unscrew all existing hardware. If you are replacing knobs with pulls, you will likely have empty holes. If you are not drilling new holes, use a high-quality wood filler to fill the voids. Once the filler is dry, sand it with 220-grit sandpaper until the surface is perfectly flush with the cabinet door. If you don't sand this properly, the shadow cast by the new hardware will highlight the imperfection.
Step 2: Marking the Placement
Do not rely on "eyeballing" it. Use a level and a pencil to mark the center point of your new holes. For upper cabinets, the standard height for a knob is usually 2 to 3 inches from the bottom edge of the door. For drawers, the center of the pull should be at the vertical midpoint of the drawer face. If you are installing long pulls on a tall pantry door, ensure they are centered both horizontally and vertically to maintain visual balance.
Step 3: Drilling (If Necessary)
If you are creating new holes, place a piece of painter's tape over your mark. This prevents the drill bit from splintering the wood grain as it enters. Use a drill bit that is slightly smaller than the diameter of the screw you will be using. Drill through the front of the door and stop once the tip emerges on the back side. This prevents the "blowout" that occurs when the drill exits the wood and pushes the grain out of place.
Step 4: The Installation
From the inside of the cabinet or drawer, insert the screw through the hole. If you are working on a cabinet door, it is helpful to have a second person hold the hardware in place on the outside. Screw the hardware in until it is snug. Do not over-tighten. If you are working with MDF (Medium Density Fiberboard) or particle board—common in many modern kitchen cabinets—over-tightening will strip the threads and make the hardware wobble permanently.
Pro-Tips for High-End Results
To elevate your project from a basic DIY to a designer-level update, keep these structural and aesthetic principles in mind:
Check your screw length: Hardware is often sold without screws, or with screws that are too short for certain cabinet thicknesses. Standard cabinet doors are often 3/4-inch thick, but if you have a thick decorative face frame, you may need 1.25-inch or 1.5-inch screws. Always check the depth of your cabinet door before purchasing your hardware to ensure the screw reaches the interior without bottoming out.
The "Weight" Test: If you are installing heavy-duty pulls on a large drawer, ensure the screw is long enough to pass through the door and deep into the drawer box itself. This provides structural integrity so the pull doesn't rip out under the weight of heavy kitchenware.
Visual Symmetry: When working in a small space like a bathroom or a narrow kitchen, hardware placement can significantly impact the perceived width of the room. Using horizontal pulls on a small vanity can make the vanity feel wider and more grounded. If you are styling a small area, remember that hardware is part of the overall composition, much like how you might style a coffee table to create balance.
The Finishing Touch: Once the hardware is installed, take a microfiber cloth and wipe down the cabinet faces. New hardware often leaves behind tiny traces of wood dust or fingerprints from the installation process. A clean, polished finish is the difference between a "project" and a "renovation."