8 Ways to Revive Your Old Hardware for a High-End Look

The Matte Black Spray Paint Method
Polishing Tarnished Brass to a Shine
Replacing Standard Knobs with Leather Pulls
Adding Texture with Textured Spray Paint
The Vinegar Soak for Deep Cleaning Metal
Mixing Metals for a Modern Aesthetic
Using Rub 'n Buff for a Metallic Glow
Swapping Basic Knobs for Ceramic Details
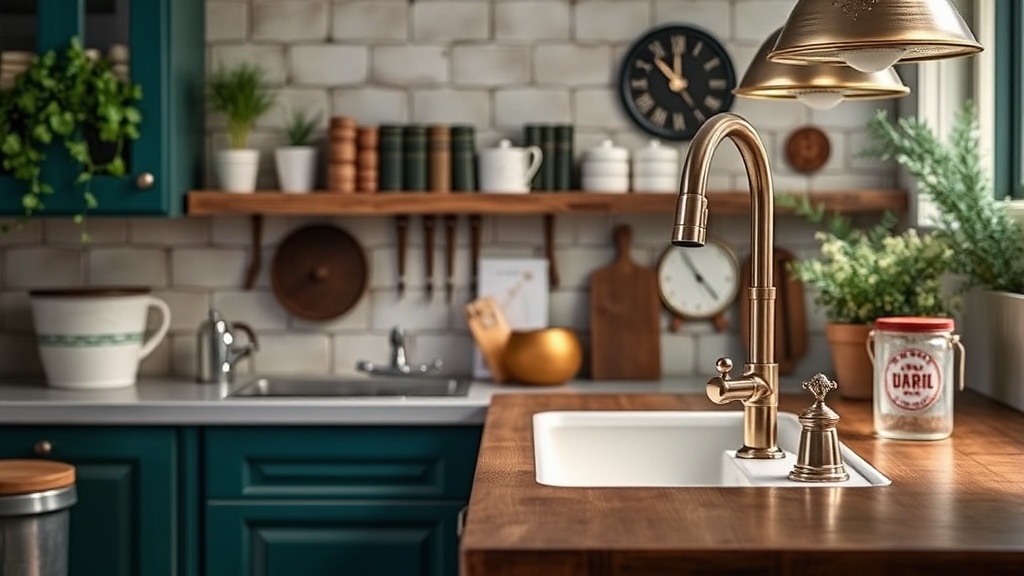
A tarnished brass pull sits on a thrifted dresser, its surface dull and scratched from years of clumsy hands. You look at it and see a cheap, dated piece of hardware that ruins the aesthetic of a perfectly good mid-century modern cabinet. Most people would reach for the box of cheap, shiny nickel pulls from a big-box store, but that's a mistake. High-end design isn't about buying new things; it's about the precision of the finish and the weight of the metal. This post covers how to strip, polish, and transform your existing hardware to achieve a high-end look that actually matches your design intent.
Replacing hardware is the easiest way to change a room, but replacing it with something cheap is a missed opportunity. If you have heavy, solid brass or bronze pulls, you're sitting on gold—or at least, something that looks like it. You just need the right chemical and mechanical approach to bring it back to life.
How Do I Clean Old Brass Hardware?
To clean old brass, you must first identify if it is solid brass or just brass-plated steel. Use a magnet to test it; if the magnet sticks, it's plated, and you'll need to be much gentler with abrasives. For solid brass, a soak in a mild acidic solution or a dedicated metal polish like Brasso works wonders to remove decades of oxidation and grime.
Start by removing the hardware from the furniture. Don't leave the screws in the wood if they're stuck—you don't want to strip the head or crack the veneer. Once the pieces are loose, soak them in a bowl of warm water with a bit of dish soap to remove the surface oils. This is the "structural respect" phase—you can't polish a dirty surface and expect a professional result.
After the soak, use a soft-bristled toothbrush to get into the crevices of the knurling or the decorative-grooves. If the tarnish is heavy, a paste made of lemon juice and baking soda can act as a natural, gentle abrasive. Just don't go overboard with the scrubbing; you want to remove the grime, not the soul of the piece.
1. The Deep Polishing Method
If your hardware looks "tired" rather than "broken," a deep polish is your best friend. Use a high-quality metal polish and a microfiber cloth. The trick is to use circular motions with light pressure. It's tedious, sure, but the way the light hits a perfectly polished surface is worth the ten minutes of elbow grease.
2. The Patina Preservation Approach
*Sometimes, "old" is actually "better." If you have a vintage piece, you might not want it to shine like a new penny. In that case, you aren't cleaning it to make it bright; you're cleaning it to stabilize it. Use a specialized metal cleaner to remove the "sticky" feel of old oils, then apply a thin layer of Renaissance Wax to prevent further oxidation. This keeps the piece looking aged but intentional, rather than just dirty.
Can You Paint Metal Cabinet Pulls?
Yes, you can paint metal pulls, but you must use a metal-specific primer and a high-quality spray paint to prevent peeling. If you skip the prep work, the paint will flake off within a month of use, leaving you with a messy, jagged-looking edge on your beautiful furniture.
I've seen so many people try to spray paint their hardware with standard craft paint and wonder why it's chipping off by the second week. It's all about the bond between the metal and the coating. If you're going to do it, do it right. It's better to spend an extra twenty minutes on prep than to have to redo the whole thing in a month.
| Method | Best For | Difficulty | Durge/Durability |
|---|---|---|---|
| Metal Polish | Solid Brass/Bronze | Easy | High (Natural) |
| Spray Paint | Changing Colors | Moderate | Medium |
| Rub 'n Buff | Adding Metallic Luster | Easy | Low |
3. The Rub 'n Buff Technique
If you want to change the color of the hardware without the permanent commitment of spray paint, use a wax-based metallic finish like Rub 'n Buff. This is a game-changer for small pulls. You simply apply a tiny amount to your finger, rub it onto the metal, and buff it out. It gives a much more realistic, heavy-metal look than cheap spray paint ever could.
4. Professional Spray Painting
If you want a matte black or a satin nickel look, you need a primer that sticks to non-porous surfaces. Look for a product specifically labeled for metal. Sand the hardware slightly with 400-grit sandpaper first to create "tooth" for the paint to grab onto. This is a lot like how I'd approach reinforcing a cheap dresser—you have to prep the foundation before you worry about the finish.
How Do I Fix Scratched Hardware?
To fix scratched hardware, you generally have two options: use a metal polish to buff out the scratch or use a filler if the scratch is deep. For light surface scratches, a fine abrasive can often remove the imperfection by leveling the surrounding metal.
If the scratch is a deep gouge, you're looking at a more technical process. You might need to use a metal filler or even a tiny bit of epoxy to level the surface before you polish it. It's a bit more "architectural" than your average DIY project, but it's the only way to ensure a smooth finish.
5. Micro-Abrasive Buffing
For small scratches on brass or copper, a jeweler's rouge or a very fine polishing compound can work wonders. You aren't just cleaning; you're actually removing a microscopic layer of the metal to level the surface. Use a steady hand and don't rush—if you go too fast, you'll create heat and potentially warp thin metals.
6. The "Hide and Seek" Method
<|p>If the hardware is truly beat up, don't try to fix the scratch—change the texture. If you're using a dark patina or a dark paint, the shadows will hide the imperfections. This is a classic designer trick. If the metal is uneven, a matte finish is your best friend because it doesn't reflect light in a way that highlights the flaws.7. Replacing the Fasteners
Sometimes the hardware is fine, but the screws are the problem. If you have shiny, modern-looking screws on an old, vintage pull, it looks jarring. It's a visual mismatch. Go to a hardware store and find screws that match the era of the pull. If you have a brass pull, use brass-coated or solid brass screws. It's a small detail, but it's what separates the pros from the amateurs.
8. Texture Re-imagining
If the hardware is aesthetically "wrong" for your room, don't just replace it. Can you wrap it? I've seen people use leather wraps for a more organic, tactile feel on cabinet pulls. It adds a layer of luxury and softens the look of a hard metal surface. It's a bit unconventional, but in design, there are no rules—only guidelines.
When you're working with hardware, remember that the weight and the feel are just as important as the look. If you've spent time fixing a piece of furniture, don't finish it off with a cheap, light-weight plastic pull that feels like a toy. Use the tools, respect the materials, and don't be afraid to get a little messy. That's where the real magic happens.