The $90 Paint Job That Outlasts Every Chalk-Paint Hack: An Architect's Surface Prep Guide

Chalk paint is not a personality. It's a coating. And the way people slap it on furniture with zero surface prep, you'd think they were frosting a cake instead of finishing a structural surface that needs to survive daily use.
I painted furniture wrong for years before architecture school rewired my brain. I'd sand a little, maybe wipe it down, crack open whatever can looked good at the store, and wonder why everything chipped within six months. Turns out, paint adhesion is actual science — not vibes — and the "no-prep" marketing behind most craft paints is the biggest lie in the DIY world.
Here's how to paint furniture so it actually lasts. No shortcuts, no magic products, just the material science that makes coatings stick to substrates. Bernice doesn't get involved in this one, but my orbital sander does.
Why Your Painted Furniture Chips (It's Not the Paint)
Paint fails for three reasons, and exactly zero of them are "you bought the wrong brand."
1. Contaminated surface. Old furniture has decades of furniture polish, skin oils, cooking grease, and silicone-based products embedded in the finish. Paint can't bond to a greasy substrate any more than tape sticks to a wet wall. If you painted over an old polyurethane finish without cleaning it first, you didn't paint the wood — you painted the grime.
2. No mechanical profile. Paint needs something to grab onto. A glossy, smooth surface gives it nothing. When you skip sanding, you're asking a liquid coating to cling to glass. It'll look fine for a week. Then someone sets down a coffee mug and lifts a quarter-sized chip right off the surface.
3. Wrong primer (or no primer). Primer isn't optional. It's the translator between your substrate and your topcoat. Different substrates need different primers — shellac-based for bleed-through on old oak and mahogany, bonding primer for laminate and previously finished surfaces, plain latex primer for raw wood. Using the wrong one is like speaking French to someone who only understands Mandarin. Technically you're communicating. Practically, nothing useful is happening.
The Actual Prep Process (45 Minutes That Save You From Repainting)
This is the part everyone skips. It's also the part that determines whether your paint job lasts two months or ten years.
Step 1: Clean with TSP Substitute
Trisodium phosphate substitute — not the real stuff, which is now restricted in most states. Mix it per the label, wipe down every surface with a rag, and let it dry. This isn't optional cleaning. This is chemical degreasing. You're removing every invisible layer of silicone, wax, and oil that's been building up since the Clinton administration.
Cost: about $6 for a box that'll last you twenty projects.
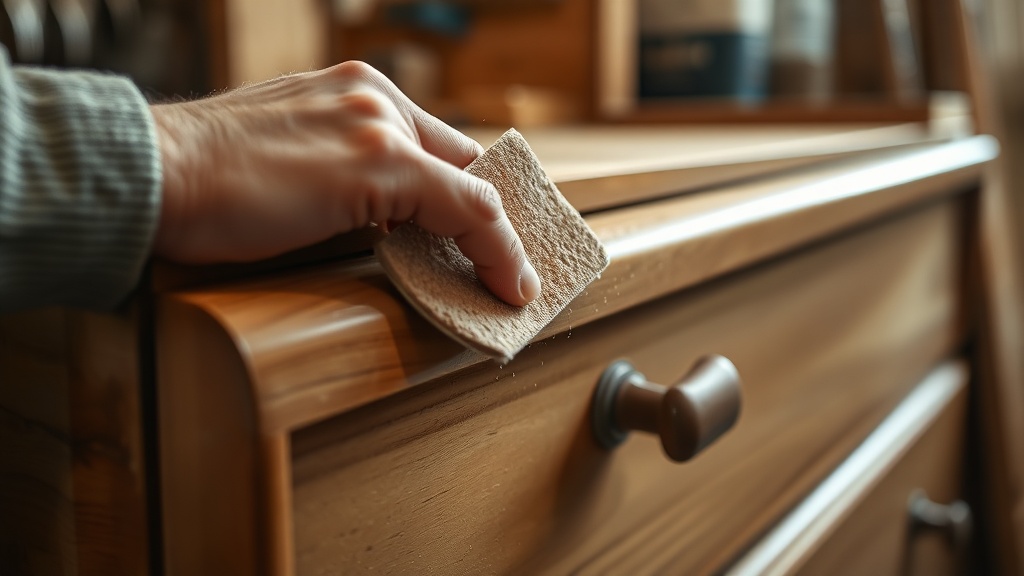
Step 2: Sand to 150 Grit
You're not stripping the old finish. You're scuffing it. There's a huge difference. Use 150-grit sandpaper — either by hand with a sanding block or with an orbital sander if you've got flat surfaces. The goal is to knock the sheen off and create micro-scratches that give primer something to key into.
Go with the grain. Don't press hard. If you see bare wood, you've gone too far on a piece that still has good existing finish. You want the surface to look uniformly dull, like matte paper instead of glossy photo paper.
For detailed areas — spindles, molding profiles, carved bits — use a sanding sponge. They conform to curves better than flat sandpaper, and they're about $3 for a pack of six.
Step 3: Tack Cloth Everything
After sanding, dust is your enemy. A tack cloth is a sticky cheesecloth that picks up every particle. Wipe every surface. Then wipe it again. Dust trapped under primer becomes a bump under paint becomes the spot where adhesion fails first.
Don't use a damp rag for this. Water raises the grain on raw wood and can reactivate old water-based finishes. Tack cloth only. They're $2 for a three-pack.
Primer: The Layer That Does All the Actual Work
Let me be blunt: if your "paint" claims you don't need primer, what they're really saying is "we've built a mediocre primer into an expensive paint and you're paying triple per gallon for the convenience of skipping a step that takes twenty minutes."
Here's your primer decision tree:
Raw wood: Any decent latex primer. Zinsser Bulls Eye 1-2-3 is my go-to. It's $22/quart, sands beautifully, and blocks tannin bleed on most species.
Previously finished wood (poly, lacquer, varnish): Bonding primer. Zinsser BIN (shellac-based) or STIX by Insl-X. These are formulated to grip slick surfaces. BIN is about $30/quart but it's worth every cent because it also blocks bleed-through from old stains and wood tannins.
Laminate or melamine (IKEA furniture): Bonding primer is non-negotiable. STIX is the gold standard here. Regular primer will peel off laminate like a sticker. I've seen it happen. I've caused it to happen, back before I knew better.
Metal hardware or accents: Rust-Oleum clean metal primer or an etching primer. Don't use wood primer on metal. Different substrates, different chemistry.
Apply one thin coat. Let it cure fully — check the can for recoat time, which is different from dry time. Sand lightly with 220-grit between primer and paint. Tack cloth again.
The Paint Itself: Stop Buying Craft Store Paint
I'm going to make some enemies here, but I don't care.
Chalk paint has its place. That place is decorative items that don't get touched — picture frames, wall-mounted shelves, seasonal decor. For furniture that humans actually use — dressers, tables, kitchen chairs, nightstands — chalk paint without a topcoat is about as durable as construction paper in the rain.
"But Sloane, I use chalk paint with a wax topcoat—"
Wax is a maintenance product, not a protective finish. It needs reapplication every few months, it rings with water glass marks, and it yellows over time. If you want to rewax your dresser quarterly for the rest of your life, go ahead. I'd rather spend that time building something.
What I actually use: Benjamin Moore Advance (alkyd-hybrid, self-leveling, cures to an incredibly hard finish) or Sherwin-Williams Emerald Urethane Trim Enamel. Both are cabinet-grade paints designed for high-touch surfaces. They cost $50–70/gallon, which sounds expensive until you realize you won't be repainting this piece in two years.
Apply with a high-density foam roller for flat surfaces and a good-quality angled brush (Wooster Shortcut is my pick) for detail work. Two thin coats. Let each coat dry per the manufacturer's specs — not your impatience timeline. Benjamin Moore Advance takes 16 hours between coats. Yes, sixteen. No, you can't speed it up with a hair dryer. The chemistry needs time.
The Cost Ledger
Because I always show my numbers:
- TSP substitute: $6
- 150-grit sandpaper (5-pack): $5
- Sanding sponges (6-pack): $3
- Tack cloths (3-pack): $2
- Primer (1 quart, BIN): $30
- Paint (1 quart, BM Advance): $28
- Foam roller + brush: $12
- 220-grit for between coats: $4
Total: $90 for a professional-grade paint job on a piece of furniture that would cost $15–20 to redo with chalk paint every year. Over five years, the math isn't even close.
And that $90 kit covers multiple projects. The sandpaper and tack cloths last through several pieces. The primer and paint will do two to three small-to-medium pieces per quart depending on size.
The One Rule I Never Break
Cure time is not dry time. Dry time means the surface isn't tacky to the touch. Cure time means the paint has fully hardened and crosslinked at a molecular level. For Benjamin Moore Advance, full cure is 30 days. For the Sherwin-Williams urethane enamel, it's about the same.
During that 30 days, treat the piece gently. Don't stack books on it. Don't set wet glasses on it without a coaster. Don't put drawer liners in yet. The paint is still hardening underneath, and heavy use during the cure window can dent or mark the surface permanently.
Yes, it requires patience. But I didn't get into this to cut corners — I got into this because doing things right means doing them once.
That dresser you painted with proper prep and good paint? It'll still look sharp when you're moving it into your next apartment. And the one you chalk-painted without primer will be in a dumpster by then, adding to the exact disposable furniture cycle that got us into this mess.
Do the prep. Buy the primer. Wait the cure time. Your furniture deserves the same respect as a building — because structurally, it is one.