Stop Throwing Out Wobbly Furniture: The Structural Diagnosis and $65 Fix

Every piece of wobbly furniture is telling you exactly what's wrong. The problem is nobody taught you how to listen.
I've lost count of how many people have told me they threw out a chair or table because it "got wobbly." That's like junking a car because the tire pressure light came on. Wobble is a symptom, not a diagnosis — and the fix is almost always cheaper than the gas you'd burn driving to IKEA for a replacement.
The Four Wobble Types (And What They Actually Mean)
Before you touch anything, sit with the wobble for a second. Push the piece gently in different directions. What you feel tells you where to look.
1. The Racker
Push the top sideways and the whole frame shifts into a parallelogram. This is racking — the most common failure in tables and bookshelves. It means your piece has lost its triangulation. Somewhere, a joint that was keeping everything square has let go.
Where to look: Corner joints, apron-to-leg connections, any place where a horizontal member meets a vertical one at 90 degrees. Nine times out of ten, you'll find a gap where glue has crystallized and cracked.
2. The Rocker
Set the piece on a known-flat surface (your garage floor is NOT flat — use a piece of MDF or plywood). If it rocks corner to corner, one leg is shorter or the frame has twisted. This is geometry, not joinery.
Where to look: Measure each leg from the bottom of the apron or stretcher down. If they're all the same length, your frame is twisted — which means a joint somewhere has shifted and dried in a new position.
3. The Noodler
One specific leg or component feels loose and floppy while the rest of the piece is solid. That's an isolated joint failure. Good news — this is the easiest fix.
Where to look: Grab the loose component and wiggle it. Follow the movement to where it connects. You'll usually find a tenon that's shrunk away from its mortise, or a dowel that's snapped inside the hole.
4. The Creaker
Everything feels tight when you push on it, but it makes noise and moves slightly under load. This is the sneaky one. The joints are still engaged, but the glue bond has failed. The wood is holding itself together through friction alone, and it's living on borrowed time.
Where to look: Load the piece normally (sit in the chair, put weight on the shelf) and have someone watch the joints. The one that moves — even a hair — is your culprit.
The Actual Fix: It's Almost Always Glue
Here's what I need you to understand about wood joints: the wood is almost never broken. The glue is broken. Original factory furniture uses PVA (yellow wood glue) or hide glue, both of which have a finite lifespan — especially if the piece has been through humidity cycles, moves, or that one time your roommate tried to stand on the dining chair to change a lightbulb.
What You Need
- Titebond III — waterproof, longer open time than Titebond II, and it's what I use on everything from cutting boards to structural repairs. A bottle is $9 at any hardware store.
- Bar clamps or pipe clamps — you need at least two. Don't use C-clamps for this; they concentrate pressure in one spot and can crush soft wood. A pair of 24" bar clamps runs about $25.
- A dead-blow mallet or rubber mallet — for persuading joints apart and back together without denting the wood.
- An old toothbrush and a putty knife — for cleaning out old glue. This step is not optional.
- Painter's tape — to protect finishes around the joint.
The Process
Step 1: Disassemble the failed joint. This is where most people panic, and it's where Bernice gives me a knowing look from across the shop because she knows I won't need her for this one. Gently work the joint apart using your mallet. If it won't budge, wrap the joint area with a cloth soaked in warm water for 20 minutes — this softens old PVA glue. Do NOT use a pry bar. Do NOT force it. If a joint won't come apart after the warm water treatment, it might still be partially bonded and you should move to injection instead (more on that below).
Step 2: Clean every surface. Both sides of the joint — the tenon AND the mortise, or the dowel AND the hole. Scrape off every bit of old glue with your putty knife, then scrub with the toothbrush. Old glue on top of new glue is not a repair. It's a lie you're telling yourself.
Step 3: Dry-fit first. Put it back together WITHOUT glue. Does it fit tight? If the tenon is now sloppy in the mortise (common in old furniture where the wood has shrunk), you have options:
- Wrap the tenon with a thin strip of cotton fabric soaked in glue (the old-school fix that actually works)
- Glue a thin shim of matching wood species to the tenon to build it back up
- For dowel joints: drill out the hole slightly and use the next size up dowel
Do NOT pack the gap with sawdust and glue. I've seen this "hack" recommended everywhere and it makes me want to throw my speed square across the room. Sawdust-glue filler has zero structural strength. You're making papier-mâché and pretending it's joinery.
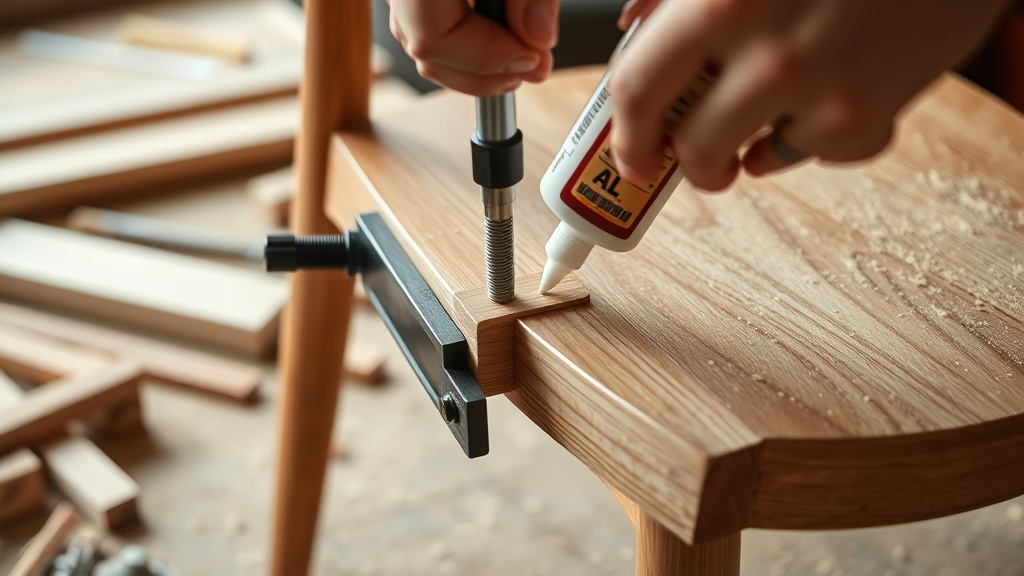
Step 4: Glue and clamp. Apply Titebond III to both surfaces — you want full coverage but not dripping pools. Assemble the joint, then clamp it. Here's the part that matters: check for square. Use a speed square or measure the diagonals. If you clamp a racked frame and let it dry crooked, congratulations — you've permanently glued your furniture into a parallelogram.
Step 5: Wait. Titebond III needs 30 minutes of clamp time minimum, but I leave everything overnight. The bottle says 24 hours for full cure and the bottle is right. Go do literally anything else. Watch a movie. Walk your dog. Do not touch it.
The Injection Method (For Joints You Can't Disassemble)
Some joints are trapped — you can't pull out one leg without disassembling the entire piece. This is common in chairs where all four legs connect to the seat through the same set of stretchers.
Get a syringe (veterinary supply stores sell them, or just order a glue injector kit for $12). Fill it with thinned Titebond — add about 10% water to get it flowing through the needle. Drill a small pilot hole (1/16") into the joint from an inconspicuous angle, inject glue until it seeps out the other side, then clamp and wipe the squeeze-out with a damp rag.
This isn't as strong as a full disassembly-and-reglue, but it buys years on a joint that was failing. I've done this on three of my own chairs and two of them have outlasted the apartment I did the repair in.
The Cost Ledger
Because you know I keep receipts:
| Item | Cost | Uses |
|---|---|---|
| Titebond III, 16oz | $9 | ~30 repairs |
| Bar clamps, pair | $25 | Forever |
| Dead-blow mallet | $15 | Forever |
| Glue injector kit | $12 | ~50 uses |
| Toothbrush + putty knife | $4 | Until gross |
Total startup cost: $65. That's less than one trip to the furniture store, and you now have the tools to fix every wobbly piece of furniture you'll encounter for the next decade. Compare that to a $200 "replacement" dining chair that'll develop the same wobble in three years because it was built with the same garbage dowel joints.
When to Walk Away
Not every piece is worth saving, and I'm honest about that. If you find:
- Split wood at the joint — not cracked glue, but the actual wood grain has separated. This can be repaired, but it's intermediate-level work involving epoxy and sometimes dutchman patches.
- Particleboard or MDF structural members — if the legs or frame are particleboard, you're fighting physics. MDF doesn't hold fasteners or glue the way solid wood does. Screw holes strip, glue surfaces crumble. It's engineered to be disposable and it is.
- More than three failed joints on the same piece — at that point you're doing a full restoration, not a repair. Still doable, but budget a full weekend and know what you're getting into.
For everything else? Your wobbly chair is one bottle of glue and two clamps away from being solid for another decade. The furniture doesn't need to be replaced. It needs someone who understands that a joint is a relationship between two pieces of wood, and relationships take maintenance.
Now go diagnose your wobble. And if Bernice asks, tell her I said hi.