Raised Garden Bed That Won't Rot: The Architect's Cut List and Material Guide

Most raised garden beds die before the basil does.
I see it every spring on the neighborhood apps: someone built a box out of pine, filled it with $80 of soil, and by September the bottom board is soft enough to push your thumb through. Two seasons later, the whole thing leans like a drunk bookshelf. They post asking what went wrong.
What went wrong is they treated a ground-contact structure like a weekend craft project.
I'm an architect by training. I spent years detailing foundations, specifying moisture barriers, and understanding why wood rots. A raised bed is a tiny retaining wall. If you think about it that way — not as a Pinterest rectangle — yours will still be holding soil when your neighbor is rebuilding theirs for the third time.
Why Your Raised Bed Rotted: A Structural Autopsy
Wood rot isn't mysterious. It's biology. Fungi need three things: moisture, oxygen, and wood fiber. A raised garden bed delivers all three in abundance. The inside face stays perpetually damp from soil contact. The bottom edge sits on earth. The corners trap moisture. This is the structural equivalent of leaving a sandwich in a warm locker.
The usual failure sequence:
- Bottom boards rot first — they have full ground contact and zero airflow
- Interior faces go next — constant soil moisture wicks into end grain at joints
- Corners separate — fasteners lose holding power in softened wood
- The whole bed racks sideways — soil pressure wins against degraded lumber
That $40 pine bed from the big-box garden center? It was designed to last exactly long enough that you can't return it.
Material Selection: The Honest Breakdown
Here's where I'm going to annoy some people. I've priced these out as of early 2026 in the Pacific Northwest. Your numbers will vary, but the ratios hold.
Cedar (Western Red)
Cost: ~$4-6/board foot for 2x lumber
Lifespan in ground contact: 8-15 years for heartwood, 3-5 for sapwood
The catch: Most of the "cedar" at Home Depot is heavy sapwood — the pale, soft stuff around the outside of the log. Heartwood is the dark, aromatic center. Sapwood cedar rots nearly as fast as fir. You need to actually look at what you're buying. If it's mostly pale with thin brown streaks, put it back.
I flip through every board in the stack. The staff at my local HD know me as the woman who reorganizes their cedar rack. I'm not sorry.
Pressure-Treated (ACQ/CA-B)
Cost: ~$1.50-3/board foot
Lifespan: 15-25 years
The controversy: Modern pressure-treated lumber uses alkaline copper quaternary (ACQ) or copper azole — not the arsenic-laced CCA that was phased out in 2003. Oregon State Extension has been running long-term leaching studies and the copper levels in soil adjacent to ACQ lumber are minimal. Is it zero? No. But copper is also a micronutrient plants need, and you're getting more copper from your tap water.
My take: for flower beds, ornamentals, or anything you're not eating raw from the ground, pressure-treated is fine. For food beds where you're growing root vegetables in direct board contact, use cedar heartwood or line the interior. It's not worth the argument either way — the risk is genuinely tiny — but the liner takes five minutes and costs $8, so just do it.
Douglas Fir / SPF (The Cheap Stuff)
Cost: ~$0.80-1.50/board foot
Lifespan in ground contact: 1-3 years
My honest opinion: Don't. I know someone will email me about their uncle's fir bed that lasted eight years. Cool. My cousin smoked for forty years and was fine. Anecdotes aren't engineering.
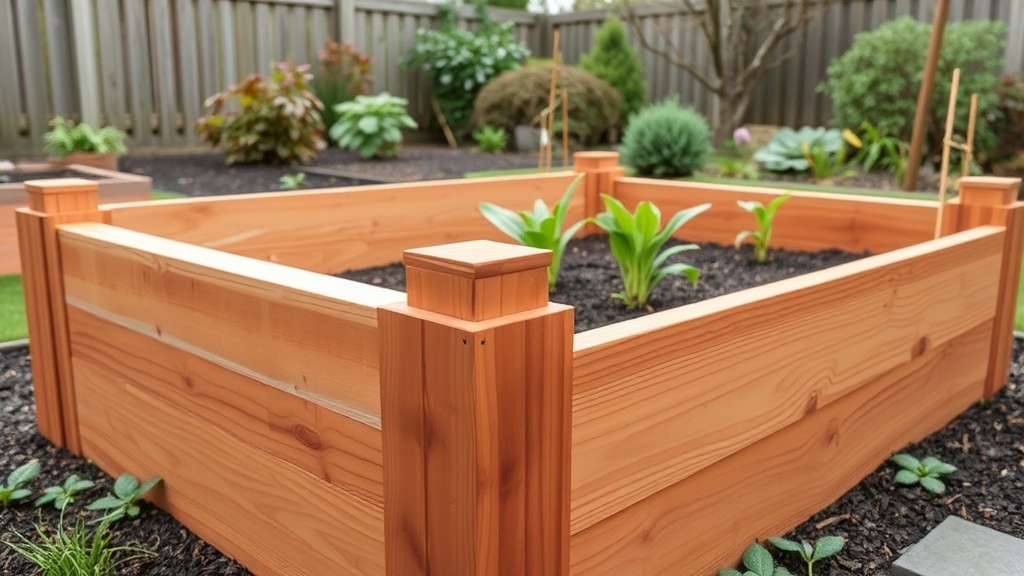
The Design That Actually Works
After building beds for myself, for neighbors, and for a community garden that needed to survive Portland rain and volunteer neglect, here's the design I've settled on. It's not the cheapest. It's the cheapest per year of service, which is the number that actually matters.
The Cut List (for a 4' x 8' x 16" bed)
- Long sides: 4x 2x8x8' cedar heartwood (rip to 7.25" if needed for consistent height)
- Short sides: 4x 2x8x4' cedar heartwood
- Corner posts: 4x 4x4x16" cedar or PT (these are hidden — PT is fine here)
- Mid-span posts: 2x 4x4x16" cedar or PT (one per long side, centered)
- Cap rail (optional): 2x 2x6x8' and 2x 2x6x4' — gives you a sitting edge and protects end grain
The Cost Ledger
Because I believe in radical transparency about what things actually cost:
- Lumber (cedar heartwood, hand-selected): ~$110-140
- Corner and mid-span posts (PT 4x4): ~$15
- Stainless or ceramic-coated screws (3" for boards, 4" for posts): ~$18
- Landscape fabric for bottom (optional, prevents weed intrusion): ~$6
- Soil and compost to fill: ~$80-120 depending on source
- Total: $230-300
Yes, it's more than the $45 kit. The $45 kit is a subscription service — you just don't realize you're paying annually.
Assembly Notes from Someone Who's Done This Wrong
1. Isolate the bottom edge from soil. Set your bed on a 2" gravel pad or use PT 2x4s as sacrificial bottom rails. The single biggest life-extension move. My first bed sat directly on clay soil. It composted itself in eighteen months.
2. Pre-drill everything. Cedar splits if you look at it wrong near the ends. Use a countersink bit. Drive screws 1.5" from any edge minimum. Bernice (my miter saw) cuts the posts clean, but the joinery is all screws — this isn't fine furniture, it's infrastructure.
3. Use structural screws, not deck screws. GRK R4 or similar. Ceramic-coated at minimum. Standard zinc screws will corrode against ACQ copper and leave black streaks down your boards. I learned this on a client's front-porch planter and had to replace every fastener at eight months. Expensive lesson.
4. Orient the boards so the bark side faces out. Look at the end grain — the growth rings curve like a frown when the bark side faces you. This matters because boards cup away from the bark side as they dry. Bark-side-out means cupping pushes the board against the soil, not away from it. It's a small thing that separates someone who understands wood from someone who watched one YouTube video.
5. Don't seal the inside face. I know this contradicts every blog post you've read. Sealers trap moisture between the coating and the wood, creating the exact conditions fungi love. Let the wood breathe. If you want a barrier between soil and wood, use 6-mil poly sheeting stapled to the interior — it's a moisture break, not a moisture trap.
The 10-Year Bed vs. The Annual Rebuild
Here's the math I always run for people who balk at the upfront cost:
- Cheap pine kit: $45 x 5 replacements over 10 years = $225, plus 5x the labor, 5x the soil disruption, and the quiet shame of watching it decompose in real time
- Cedar heartwood bed, built once: $250, one afternoon, done
The numbers are almost identical. The difference is your Saturday mornings.
One Last Thing
If you're building your first raised bed this spring, do me a favor: skip the miter joints on the corners. I see these constantly on Instagram — perfect 45-degree miters on raised bed corners. They look beautiful for about six weeks. Then the wood moves (because wood always moves) and you've got a gap that funnels water directly into end grain. Butt joints with a corner post behind them. Ugly? Maybe. Durable? Absolutely.
Architecture taught me that the prettiest detail isn't always the smartest one. The smartest one is the one that still works when conditions change — and conditions always change.
Now go sort through the cedar rack. You know what to look for.